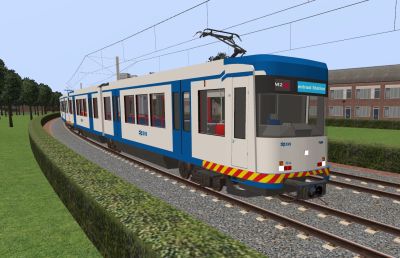
Amsterdam M4
| Amsterdam S3/M4 | ||||||
|---|---|---|---|---|---|---|
 | ||||||
| Series | ||||||
| S3: 70-73 M4: 74-106 | ||||||
| Traction power supply | ||||||
| S3: side rails / overhead wire M4: side rails / overhead wire (shunting) | ||||||
| Protection | ||||||
| ATB / ZUB / Coded Manual max. speed 70 km/h | ||||||
| Download |
The Amsterdam S3/M4 metro's (build by CAF) were ordered for line 50 of the Amsterdam metro system. As the word "Metro" was very sensitive in Amsterdam's political landscape (due to the first metro line caused many homes to be demolished in order to build the underground section using the cut-and-cover method), this new extension to the network had to be presented as a "sneltram" (fast tram) instead. Therefore, the vehicles had to be street-legal, which means they would need to be equiped with turn signals and breaking lights. However, as line 50 does not mix with street traffic, these lights on the vehicles are not used. And for the same reason, it was decided to use 3rd rail power instead of overhead wires. However, the platforms were initially designed for the tram vehicle width of 2,65 meters, to ensure only the "sneltram" vehicles could be used here (so they didn't have to call it "metro"). These days, line 50 is referred to as a normal metro line, as it is build to full metro standard (the platforms were later adapted to allow 3 meters vehicle width), and the other (not "sneltram" designated) trains are now used on line 50 too. The S3/M4 vehicles can now be found on all lines, except line 52, and are usually operated in sets of three.
The first 4 units, numbers 70 though 73 (designated type S3), have been equiped with full pantographs, so they could also be used on the tram section of line 51 between Amsterdam South station and Amstelveen. The others, numbers 74-106 (designated type M4), have been equiped with smaller pantographs for shunting only, and in service only run on 3rd rail power.
Note: On the Amsterdam metro network, the standard vehicle width is 3 meters. On the tram network, the vehicle with is 2,65 meters. As the S3/M4 trains are designed as "Sneltram", they had to be 2,65 meters wide. In order to bridge the gap between the vehicle and the platform edge on the metro stations, stepping boards are provided on the sides of the vehicle, which are rotated down when the vehicle transitions to the tram network (where the platforms are set to 2,65 meters vehicle width). However, Metrosimulator was originally build using the Rotterdam metro system for its standards, which also uses 2,65 meters vehicle width. Therefore, in the simulator, all platforms are already for 2,65 meters vehicle width, and the mentioned stepping boards would be useless in the simulator. For this reason, this function has not been included in the model.
The following variants of this train are available:
- GVB livery 1996
- GVB livery 2004
- GVB livery 2015
- GVB livery 2021
- Repaintable version
The texture file for the repaintable vehicle can be found in \Data\Amsterdam\textures.
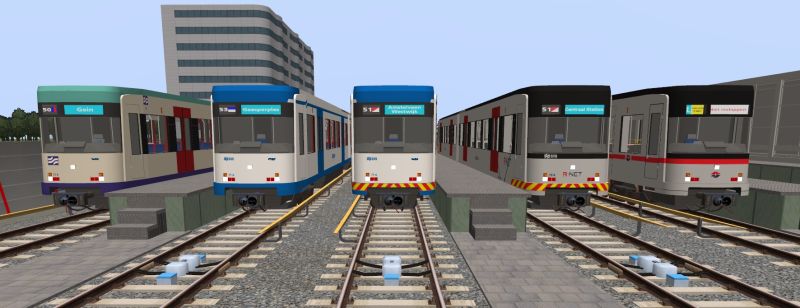
When released, this train is part of the "Amsterdam" pack, which includes these trains:
Model created by Sjoerd Ydema.
Operation in Metrosimulator
Power supply
The S3 trains can run on both 3rd rail power and overhead wire.
The M4 trains can run on 3rd rail only, but they have also been equiped with a small shunting pantograph, which is only ment for slow speed shunting in the Diemen depot of the Amsterdam metro network. This pantograph has a maximum range of 4,7 meters above the track. As most overhead wires in Metrosimulator are at 5 meters, this isn't very usefull. However, in the network "Rijndam Metro 2022", the overhead wires at depot "Bergenseweg" (connected to track 3 at Station Westplein) have been re-installed so the M4 and M5 metro's can use them.
Automatic Train Protection
The following automatic train protection (ATP) systems have been installed:
- RET ATB (LZB801)
- ZUB (222c)
- Coded Manual (for use on the Central Line map, 2021 and Repaint versions only)
- ATP OFF (for use on the City of Thames map)
The train will automatically select the correct system when you spawn it in one of the networks. Switch-overs between ATB and ZUB will happen automatically as you transition between systems, just like on the RET SG3 trains.
(The user-operable ATP selector switch option has not been installed, as it blocks the automatic ATB-ZUB vv transitions, and the AI doesn't operate this switch.)
Train operation keys
- Shift+X _ Left driver cabin door
- Ctrl+X _ Right driver cabin door
- Ctrl+Shift+X _ Internal driver cabin door
- Ctrl+L _ Driver desk light on/off (when in tunnels)
- Shift+L _ Passenger lights on/off (when in tunnels)
- [ _ Left turnsignals
- ] _ Right turnsignals
- \ _ Emergency turnsignals
- / and * (Numpad) _ Destination display
- Shift+/ and Shift+* (Numpad) _ Service number display
- Ctrl+/ and Ctrl+* (Numpad) _ Changing route diagrams in passenger compartments
Codes for activities
To use them in your own activities, you can use these codes:
  <train pack="Amsterdam" file="S3_1996.xml"/>
  <train pack="Amsterdam" file="S3_2004.xml"/>
  <train pack="Amsterdam" file="S3_2015.xml"/>
  <train pack="Amsterdam" file="S3_2021.xml"/>
  <train pack="Amsterdam" file="S3_RP.xml"/>       Repaintable version
  <train pack="Amsterdam" file="M4_1996.xml"/>
  <train pack="Amsterdam" file="M4_2004.xml"/>
  <train pack="Amsterdam" file="M4_2021.xml"/>
  <train pack="Amsterdam" file="M4_RP.xml"/>       Repaintable version
Example of how to place an M4 train in an Simvliet activity:
 <consist start="BPD1">
   <train pack="Amsterdam" file="M4_2004.xml">
	<cab id="0" enabled="true" ai="364"/>
	<car id="0" scrollsign3="13" scrollsign2="64"/>
	<car id="1" scrollsign3="13"/>
   </train>
   <train pack="Amsterdam" file="M4_2004.xml">
	<car id="0" scrollsign3="13"/>
	<car id="1" scrollsign3="13" scrollsign2="64"/>
   </train>
  </consist>
Note: The "scrollsign3", for the passenger line diagrams, must be set for each carriage individually if you want the simulator to show these upon loading the activity. You can always also set them manually once the simulation has started (in which case it effects the complete train at once).
External links
